Posts

Showing posts from 2023

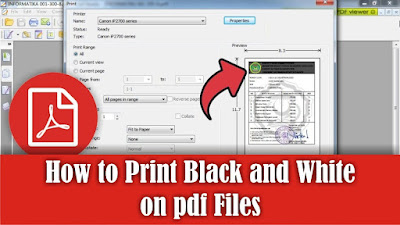
How to Print Black and White PDF Not Greyscale

Image
To print without color or black and white on a PDF file is very easy, because some PDF file opening applications provide a Greyscale feature where this feature can print PDF files without color. However, not all PDF file opening applications provide the Greyscale feature, moreover, it is not uncommon if we have activated Greyscale, the printed results still have colored parts. So that's why we set it directly on the printer. The method is very easy. So for black and white printing, we set it directly on the printer so that we don't have to set it to grayscale every time. Okay, coincidentally here I am using a Canon IP2700 printer. To set grayscale, it is usually in the properties on the printer. Usually also in the acrobat reader application there is a setting for Grayscale. But here nitro doesn't have grayscale, so we can set it in the properties. Friends, enter or select maintenance on the Canon IP2700 series properties. Well after that, friends, select this Ink Catridge ...

How to Set F4 Paper Size on Canon IP 2770 Printer

Image
Well, sometimes when we are going to print we cannot set the paper size on the file that we are going to print. However, we can set the paper size in the printer settings, for example we will print with F4 paper size. As a note in this tutorial I am using a Canon brand printer. For example, we will print on a PDF file, then friends open the PDF file then go to the print display. After that select Properties and the Canon IP2770 Properties display will appear. In the Quick Setup menu, friends change the paper size in Printer Page Size. Because F4 paper size does not exist, we choose Custom to determine the paper size ourselves. After that the Custom Paper Size display will appear, change the size to millimeters, then determine the F4 paper size, namely 210 mm wide and 330 mm high. After that click OK to save the settings, and click OK again to close the Canon IP2770 Properties. Click OK again to continue the printing process. So how are you friends, easy right? Hopefully this tutorial i...

How to Remove Print Area in Microsoft Excel

Image
As you know, Print Area is a feature in Excel that allows us to print a specific area that we choose. For those of you who are used to using this feature, it must be easy to create or remove Print Area in Excel. Now, for those of you who are new to using this feature and have difficulty removing the active Print Area, you need to watch this tutorial. Now, to remove it is quite easy. You just need to go to the page layout menu, then select print area, then just click clear print area. Now, it will automatically disappear and the dotted lines on all pages or parts of the excel file will disappear. Likewise, the print preview will display all the data in this excel file. How are you, friends, is it easy? Hopefully this tutorial can be useful for all of you.

How to Create Underline for Signature in Microsoft Word

Image
In the world of work, sometimes we are asked to write a letter and in the name section for the signature below there is a line. Maybe there are still many friends who do not know how to make the line correctly. Well, for that, friends need to watch this tutorial. To make a line under the name in Microsoft Word is very easy, we can use two methods. The first way is we can use the underline feature. The method, friends, just select the part of the name that you want to make a line under. Then friends, just click underline or you can also press the Control button and the I button simultaneously on the keyboard. Well, it will appear immediately. For the second method, we can use the shapes feature. Friends, just open the Insert Menu then select shapes and select the line shape. Click then make a straight line right under the writing. Try to make the line straight so that it looks good. Well, how about it, friends, is it easy? Hopefully this tutorial can be useful for all of you.

How to Put a Check Mark in a Microsoft Word Column

Image
Maybe you are making an attendance or some kind of data that requires a check mark or tick on the data file, but you are confused about how to write the correct check mark or tick in Word. Usually you use the root symbol or the letter V symbol to write the check mark or tick symbol. Well, in this tutorial I will provide a tutorial on how to give the correct check mark in a column in Word. First, place the cursor in the place where we will give a check mark, then go to the Insert menu, then select Symbol and select More symbols. Change the font to Wingdings, then look for the Check symbol, usually at the bottom. Then you click the check mark and click Insert. Now the check mark symbol will automatically appear, if the size is too small, you can change the size by adjusting the size in the Home menu. For other parts that you want to give a check mark or tick, you can directly copy the old symbol and paste it into another part of the part you want to check. Well, how about it, friends, is...

How to Move Image to the Center of Worksheet in Microsoft Word

Image
Maybe there are still some of you who are new to using Microsoft Word and are still confused about how to move an image to the middle of a page in Word. Because after we insert an image into Word, it is not automatically in the middle. Therefore, in this tutorial I will share with you, please watch until the end. You go to the Home menu, then in the Paragraph section, you just need to set or select the Alignment of the image. Since we will position the image in Word in the middle, we select Align Center. The image will automatically move to the middle. Well, how about it, friends, it's easy, right? That's how to move an image to the middle of a worksheet in Word. Hopefully this tutorial is useful for all of you

How to move Page Numbers from Top to Bottom in Microsoft Word

Image
Maybe some of you are still confused about how to move the position of the page number on a Word worksheet. Therefore, in this tutorial I will share the method with friends, watch the tutorial until the end. Enter the Insert menu, then select Page Number, then select Remove Page Number to remove the previous page number. After that, go back to the Insert Menu and select Page Number. Then select Bottom of Page, to create a page number at the bottom of the page. Select the desired page number position, on the left, middle or right. After that, the page number that was previously at the top is now automatically at the bottom. As for the previous page number, you just have to delete it. How about it, easy right? That's how to move page numbers from the top to the bottom of the page, hopefully this tutorial can be useful for all of you.

How to shrink column size in Excel at once

Image
Maybe some of your friends are creating a table in Excel, and there are several columns that you want to make smaller. Shrinking an Excel column will be difficult if there are many columns that we want to resize, therefore it is easier if we change them a lot at once. In this tutorial I will share the method with friends, read until the end. Friends, select the columns that will be resized to a small size at once, by hovering the cursor over the column head until the cursor changes to a downward arrow. Click on the column head, hold then slide to the side until selecting several columns that will be resized. After that, right-click the mouse on the selected column, then select Column Width. Set the desired column size, then click OK to save the settings. Now the size of the column you selected will automatically change simultaneously. How about it friends, it's easy, right? That's how to shrink Excel columns simultaneously. Hopefully this tutorial can be useful for all of you.

How to make vertical text in Word table

Image
There are times when we create a table in Word, the column titles or contents of the columns are very long so it is very difficult to adjust the width of the table so that it fits the width of the page. One way to make the table fit the width of the paper even though the table column headings are long is to make the writing vertical or extending from top to bottom. To make vertical writing in a Word table, it is very easy, friends, please read this tutorial until the end. First of all, prepare a table whose writing we will make vertical. Then select or select all the columns whose writing you want to change. After that, go to the Layout menu in Table Tools, then click Text Direction. Click Text Direction until the writing changes to vertical, there are two forms of vertical writing. Vertical writing that can be read from top to bottom and vertical writing that can be read from bottom to top, choose according to your wishes. After we change the shape of the writing to vertical, friends,...

How to create a checklist box in Ms. Word

Image
Usually we see checklist boxes on forms that are usually distributed by people. The checklist box is in the form of a small box which we will later check if the answer we give is appropriate. If you are creating a form, you must create this checklist box. To make a checklist box, it's very easy, friends, read this tutorial to the end to find out how. To create a check box, we use Shapes, friends, go to the Insert menu then select Shapes, then select the box shape. Friends, make a rectangular box with a size adjusted to the height of the writing on the side (see picture above). Then place the checklist box next to the writing, make sure it is parallel to the writing and the other checklist boxes. To make it easier or faster to make other checklist boxes, friends, you can copy and paste the first checklist box we made. If you want to edit the checklist box that we created, you can edit it in the Format menu. In the Format menu in Drawing Tools, friends can remove the fill or backgrou...

How to delete the middle of table in Microsoft Word

Maybe when you get a table and see the appropriate contents in the middle you want to delete it, but you don't know how. Don't want to delete the middle part instead the entire table will also be deleted. So for that, friends, you need to read this tutorial until the end. Friends, select or select the part of the middle table that will be deleted or removed, after that, friends, right click on the mouse on the part of the table that has been selected. Select Delete Cells, then a new window will appear, friends can select Delete entire row or Delete entire column, then click OK to save the settings. Automatically the part of the table marked earlier will be deleted or lost. So, how about it friends, it's easy, right? that's how to delete the middle of a table in Word, I hope this tutorial is useful.

How to delete excessive tables in Microsoft Excel

Maybe friends, before creating a table in Excel, didn't predict in advance the number of rows that would be used, so that after the table was finished there were more. So, it's very easy to delete excess data from a table in Excel. To find out how, friends, read this tutorial until the end. Friends, select the part of the table that is redundant and you want to delete, then right click on the part marked earlier. After that select Delete. A new window will appear, friends, just click OK. Instantly the section of the table that was selected earlier will disappear. So how about it friends, it's easy, right? That's how to delete excess tables in Excel, I hope this tutorial is useful.

How to shrink picture size in Word document

Image
For friends who are just learning to use Microsoft Word, they are definitely still confused when inserting images and want to set the size to a smaller size. Therefore, read this tutorial until the end to find out how. Friends, first enter the image into a Word document, if it already exists, friends, click on the image until a circle appears on the sides and corners of the image. Place the cursor at the corner of the image until it turns into a slanted arrow. Then click on the mouse, hold it, don't release it yet, then slide the mouse downwards to shrink the image. Release the mouse click and the image size has shrunk from its previous size. So, how about it, friends, make it easy? That's how to shrink an image in Microsoft Word, I hope this tutorial can be useful for all of you.

How to move slides Ms. PowerPoint from bottom to upper

Image
Maybe you have experienced slides in PowerPoint that are messy, meaning that the slides that should be at the top are instead at the bottom and vice versa and you are confused about how to rearrange them. So, to restore the slide order to its correct order, it's very easy. Read this tutorial to the end to find out how. We only need to shift the slide to be moved, by clicking on the selected slide. Hold on, don't let go, just click the mouse, then friends, slide it to the desired position. Swipe up if you want to move the slide to the top, and swipe down if you want to move the slide to the bottom position. So how about it friends, it's easy, right? that's how to move ppt slides from bottom to top or vice versa. Hopefully this tutorial can be useful for all friends.

How to insert images in tables Ms. Word on phone

Image
Nowadays, editing or creating Word documents is really easy, you no longer need to open a laptop or computer because you can just use your cellphone. One application for creating and editing Word documents is WPS Office. The features are also not much different from those in Microsoft Word, although they are not as complete as in Microsoft Word. One thing we can do with the WPS office application is insert images into tables in Word documents. The method is very easy, read this tutorial until the end to find out how. First of all, open a Word document on your cellphone using the WPS Office application, after that enter edit mode. Then, friends, place the cursor in the part of the table where the image will be inserted. Then go to the Tools Menu, then select Insert, and in the image section, friends, click the image icon. Select the image you want to insert, then click Ok to insert the image into the Word document. After that, friends, adjust the size of the image until it matches your ...

How to change text in Ms. Word into an image

Image
Have you ever thought about whether you can change writing in Word into an image? It turns out you can. Here we do not use screenshot software, nor do we use a camera, but we use the features of Microsoft Word. The method is very easy, friends, read this tutorial until the end to find out how. First determine the text that we will convert into an image, then select all the text. After that, right click with the mouse on the text that was selected earlier. Then select Copy, then place the cursor on a blank page, then go to the Home menu, then click the down arrow on Paste and select Paste Special. Then a new Paste Special window will appear, then select Picture and select OK. So, automatically the text that we copied earlier will be pasted in the form of an image. How about it friends, it's easy, right? That's how to change text in Word into an image, I hope this tutorial can be useful for all of you.

How to make 3 lines on the cover in Ms Word mobile

Image
There are various forms of paper covers, one of which we often see is the form of a paper cover which has 3 lines in the middle of the paper cover. So, this time we will make a paper cover with 3 lines in Ms Word mobile using the WPS Office application. The method is very easy, read this tutorial until the end to find out how. Friends, open a Ms Word document using the WPS Office application on their mobile, then enter edit mode. Then go to the tools menu in the lower left corner, then select insert. Then in the Shape section, friends, click the three dots next to it. After that, select the line shape, the line will automatically appear on the Word worksheet. Arrange the lines so they are perpendicular, create two other lines to the left and right of the first line. Usually the other two lines are shorter than the first line we made. After that, friends, you can edit these three lines. Edit it in the Drawing Tools in the Tools menu, where we can adjust the line thickness, line color an...

How to make a horizontal line in Microsoft Word mobile

Image
There are many reasons why we make horizontal lines or lines that extend from left to right in Microsoft Word, one of which is when making letterheads. So, this time we will create a horizontal line in a Word document using the WPS Office application on a cellphone. The method is very easy, read this tutorial to the end to find out how to make it. First open a Word document using the WPS Office application or create a new document in WPS Office, then select the Tools menu in the lower left corner. Then click Insert, scroll down until you find Shape, click and select Line. Arrange the line according to its length and also adjust its straightness. To edit this image, friends can select Drawing Tools, we can edit the thickness of the line and its color. Apart from thickness and color, we can also edit the style of the line, here there are only 3 line styles, straight line, dotted line and dotted line. So how about it friends, it's easy, right? That's how to make straight lines in ...

How to insert images in word mobile

Image
There is a condition that requires us to create or edit a Ms Word document, but we don't have time to open the laptop or computer so we are forced to use a cellphone to edit or create the Word document. One of the editing or creating and opening applications for Ms Word documents that we can use is the WPS Office application. This time I will insert an image into a Ms Word document using WPS Office, the method is very easy, read this tutorial to the end to find out how. First open the Ms Word document file using the WPS Office application, then friends enter edit mode so we can edit the Ms Word document in WPS Office. Then, friends, place the cursor on the part where the image will be inserted. Then go to the Tools Menu, then select Insert, and in the image section, friends, click the image icon. Select the image you want to insert, then click Ok to insert the image into the Ms Word document. After that, friends, adjust the siz...

How to Open Two Word Documents Simultaneously on One Screen

Image
Maybe some of you want to open two Word documents simultaneously on one screen, but are confused about how to do it. So in this tutorial I will share the method with friends. To open two document files at the same time, first open the two Word documents. After that, friends, minimize both documents, by clicking the "Minimize" button next to the "Close" button in the top right corner. Then you just need to adjust the width and height of the two document files so that they can fit on one PC monitor screen or your laptop screen. So, how about it friends, it's easy, right? That's how to open 2 Word files on one screen, I hope this tutorial can be useful for all of you.

How to Fix Sideways Arranged Word Worksheets

Image
Maybe there are friends who are just learning to use Microsoft Word and feel confused by the appearance of pages in Word which are arranged sideways, usually two or more pages arranged sideways, which are usually arranged one page down. Friends, don't worry, we can overcome this by setting up Zoom. The Zoom settings in Microsoft Word are in the lower right corner, friends, you can set the Zoom bigger so that the Word page display can return to one page arranged downwards. Apart from that, we can also adjust the zoom in the "View" menu. There we can manage the Zoom even better because there are advanced settings for Zoom. So that's how to deal with Word worksheets that are arranged sideways, I hope this tutorial can be useful for all of you.

How to Make Portrait and Landscape Pages in Google Docs

Image
Maybe some of your friends are currently learning to use Google Docs to create written documents. As you know, Google Docs is basically the same as Microsoft Word, but in terms of features Google Docs is not as complete as Microsoft Word. Including working paper settings, however, we can make paper or work pages in Google Docs in portrait and landscape form in one document. The method is very easy. Friends, first determine which page you want to change to landscape view, then select all the text on that page. Then friends, go to the "Format" menu and select "Page Orientation". Then a "page orientation dialog box" will appear, then select the selected content, after that select "landscape" orientation. Then click "Ok" to save the settings. And automatically the selected page will change from portrait to landscape. So that's how to make a page in Google Documents portrait and landscape in one document, I hope this tutorial can be usef...

How to Create a Landscape Page in Google Doc

Image
Maybe some of your friends are starting to create a document in Google Docs, but are having difficulty finding the settings to change the paper to Landscape form because they are used to using Microsoft Word. So, that's why I will share the method with friends. First go to the "Format" menu in Google docs, then friends select "Page orientation". Then the "Page Orientation dialog box" will appear. To change the paper shape from portrait to landscape, friends, change the orientation to "Landscape", then select "Ok" to save the settings. Now automatically all pages in Google docs will change to Landscape. That's how to create a landscape page in Google Docs, I hope this tutorial is useful.

How to Delete Multiple Sheets in Excel at Once

Image
Maybe there are still some friends who are still deleting sheets that are not needed in Excel one by one. This method is good if the number of sheets to be deleted is small, so what if there are a lot of sheets? Surely it will be difficult, right? For this reason, in this tutorial I will share how. Friends, open the Excel file that you want to delete the sheets in, then right-click with the mouse on one of the sheets you want to delete. After that, friends, select the "Select All Sheets" option. Well, in Microsoft Excel we can't delete or empty the sheet, so we have to leave one sheet. The way, friends, is to press the Ctrl key on the keyboard, and hold it down, don't let go, then click on one of the sheets. Then, friends, release the Ctrl button that was pressed earlier, after that, friends, right-click on the sheet that was selected earlier and that you want to delete with the mouse. Then select the Delete option to delete the marked sheet. So how about it friends, ...

How to Print Certain Pages in Microsoft Word

Image
Maybe there are still some friends who are still confused about how to print certain pages in Microsoft Word, but the method is very easy. First of all, open the word document that we will print on a certain page. Then go to the Print menu. After that, friends, pay attention to the Settings section, friends, change from Print All Pages to Print Custom Range, or friends, you can directly fill in the pages that we want to print in the Pages section. The rule for writing pages to be filled in is 1-5 to print pages 1-5 only. Or you can also set the pages to be printed, namely pages 1, 3, 5-12, which means only pages 1, 3, 5 to 12 will be printed while pages 2 and 4 will not. Fill in according to the page you want to print or print. After that, click Print to continue with the printing process. So how about it friends, it's easy, right? That's how to print non-consecutive pages or certain pages in Microsoft Word.

How to Print a Lot of Pictures on One Page

Image
Maybe friends want to print a large number of photos in Word, but the photos must be the same and have the same size. The method is very easy, in this tutorial I will share it with all my friends. First, insert the photo that we want to print, then set the photo in length and width and place it on the edge of the work paper. Then friends, click on the image, then press the Ctrl key on the keyboard, don't release it, then click again on the image, hold down, don't release the click first, then move the mouse to the side of the image. Do the same for the image next to it. So, for the bottom image, friends, press the Ctrl key on the keyboard, don't release it, then click on all the images then click on the image again then slide it down. Do the same thing for the image below again. So, how about it friends, it's easy, right? That's how to print lots of photos on 1 paper in Microsoft Word.

How to Add New Blank Page in Microsoft Word

Image
Maybe some of you are still confused about adding a new paper page in Microsoft Word. So, in this tutorial I will share how. There are several ways to create a new page in Microsoft Word. The first way, we can press the enter key on the keyboard at the end of the page until a new page appears. Or we can also create a new page by pressing the Ctrl key and the Enter key on the keyboard so that a new page appears. Alternatively, we can go to the Insert menu, then select Blank Page. Friends, just choose the method which you think is easier and quicker to do. So, how about it friends, it's easy, right?

How to Combine 2 Word Files Into One

Image
Maybe friends don't think so, it turns out that Word files can also be combined into one, this method is very good when friends are confused about typing so we just have to take the text from another document and make it into one. As for how to combine two Word files into one method, it is very easy, first open the document file that you want to combine. Next, friends, place the cursor at the beginning or end of the document, if you want to add text from another document to the beginning or end of the text. After that, go to the "insert" menu, then select "Object", then select "Text from file", look for the documents we want to combine. Click the file and click "Insert". Now automatically the file or text in the other document will appear, you just need to arrange it to match the existing file. So, how about it friends, it's easy, that's how to combine Word files into one.

How to Set Automatic Indentation in Google docs

Image
What is meant by automatic indentation in a paragraph is the same as the indented line at the beginning of the paragraph. So, instead of friends getting tired of organizing it, it's better if we make the indentation automatic. In this tutorial I will share how. First open the document file in Google docs, then go to the format menu then select Alignment & Indent, then select Indent Options. Then a new Indent options window will appear, pay attention to the special indent section, change it from none to the first line. After that, change the size of the indentation or indentation according to your needs, then select apply to save the settings and apply to the document. Now the indent will automatically be indented according to the distance specified earlier. How about it friends, it's easy, right? that's how to set automatic indentation on the first line of a paragraph in Google docs.

How to Delete Files in Google Drive in Bulk

Image
Maybe there are still friends who are still confused about deleting files in Google Drive, but there are so many files to be deleted that it will be difficult to delete them one by one. So, I will share how to delete lots of them at once. OK, straight away, friends, click on one of the files in Google Drive, then friends, press the Ctrl button and the A button on the keyboard to select or mark all the existing files. Then, friends, pay attention to the three dots at the top of the file you selected. Click the three dots, several options will appear, select Move to trash. So, the selected file will automatically be deleted and will be moved to the Google Drive trash. How about it friends, it's easy, right? That's how to delete lots of files in Google Drive at once, I hope this tutorial is useful.

How to Print Black and White on pdf Files

Image
Maybe there are still some of you who haven't or are still confused about how to print in black and white or print without color on PDF files, especially on the Foxit Reader application. So in this tutorial I will tell you how. OK, straight away, friends, open the PDF file using the Foxit Reader application, then go to the print menu by clicking on the printer icon or by pressing the Ctrl and P keys simultaneously on the keyboard. To be able to print without color or just in black and white, friends, you can immediately check the words Print at Grayscale, then it will automatically remove the color from the PDF file. Friends, you can see the changes in the preview display on the right. After that, you can immediately click OK to continue with the printing process and you can see the results. So, that's how to print black and white on PDF files in the Foxit Reader application, I hope this tutorial is useful.

How to Extract One Files From a .rar File

Image
 This tutorial is useful if you want to extract or remove files in a Rar file, but you don't want to extract all the existing files. Previously here I used the WinRar application to open Rar files, if you haven't installed it yet, please install it first. OK, straight away, friends, open the Rar file from which we will extract one of the files, then friends, right click on the mouse on one of the files you want to extract. Then several options will appear to extract files, namely "Extract to a specified folder" and "Extract without confirmation". To make things easier, I will choose "Extract without confirmation", so that the extracted file will appear in the same folder as the Rar file. Friends, just click "Extract without confirmation", and the file will automatically come out of Rar. How about it friends, it's easy, that's how to extract one of the files in a rar file. Hopefully this tutorial can be useful for all of you.

How to Split a PDF File Into Several New Files

Image
There are times when we get a PDF file containing test cards from several students, now these cards will be given to each student, but how can they be divided if the cards are combined in one pdf file? The car is that we separate it first, then we divide it. It is very easy to separate it, but what is important is that we need our computer or laptop to be connected to the internet network because later it will be separated online. After your laptop or computer is connected to the internet, open the ilovepdf.com site site . Maybe some of my friends are familiar with this site, okay then friends choose Split PDF. Select the PDF file to split. Then select Extract Pages, friends can see the PDF file that was previously one into several files depending on how many pages there are. After that, you can leave the Extract Mode to extract all pages, then select Split PDF to proceed to the splitting process. Now after that friends can download the PDF which has been separated, or it will be downl...

How to Print PDF File 1 Page Into 4 Parts

Image
Maybe friends have an image file, but the file is in the form of a PDF file and friends want to print the PDF image in large size. Now, the way to print a large 1-page PDF file into 4 parts is very easy. First, friends, first open the PDF file that will be printed into 4 parts or paper, then friends, enter the print menu. So here I am using a Canon brand print which has features that make it easier for us to print into 4 parts. Then go to Properties, then the Canon Ip 2700 series properties dialog box will appear. Then select the Page Setup menu and in the Page Layout section, change it from Normal Size to Tiling/Poster. To print into 4 parts, friends, open the settings on Specify. Then the Tiling/Poster Printing dialog box will appear again, then change the Image Divisions from Divided into 2 to Divided into 4 (2 x 2). After that click OK to save the settings and click OK again to close the Canon Ip 2700 series properties. Then friends click Print to continue the printing process and ...

How to Delete Files on Google Drive

Image
Sometimes friends want to delete files in your Google Drive, but are still confused about how. Maybe friends who have been using the Google Drive storage service for a long time already know how. As for deleting files on Google Drive, the method is very easy, first open Google Drive, friends using a Google account. Then first determine the files to be deleted, click with the mouse, then friends can right click on the mouse. Then select move to trash, or you can also click on the three dots in the file and select move to trash, or you can also press the Delete button on your keyboard. And all files that were deleted earlier will be stored first in the trash. If you want to delete it permanently, you can delete it in the trash on your Google Drive. Well, how about friends, how easy is it? That's how to delete files on Google Drive. Hopefully this tutorial can be useful for all my friends.

How to Create a New Folder on Google Drive

Image
After friends enter several files into Google Drive, what next? Next is to make a folder for the file so that the files in our Google Drive are not cluttered or look neater. The way to create a new folder on Google Drive is very easy, first open Google Drive using your friends Google account. Then right-click on the mouse outside the Google Drive file, then select New Folder. Or you can also click on the down arrow next to My Drive, then select New folder. Then a New Folder dialog box will appear, fill in the name of the folder that we will create, then select or click Create. Then automatically a new folder will appear on your friends Drive and is ready to be filled with files. So how about friends, how easy is it? That's the way to create a new folder on Google Drive, I hope this tutorial can be useful for all of you.

How to Move Word Files to Google Drive

Image
Google Drive is a synchronized data storage service developed by Google. Friends can store all kinds of files on Google Drive, including Word document files that friends think are important and don't want to lose if they are stored on a computer or laptop storage. However, storage on Google Drive is limited to 15 GB, if you want to increase your storage quota, friends can buy it to get extra storage. But for me 15 GB is big enough so no need to add more. Now, to insert or move Word files into Google Drive, the method is very easy, first, friends, first open Google Drive using your Google account. After that, friends, click the down arrow next to My Drive. Then select Upload File, then please search for and select the Word file you want to include or move to Google Drive. After that, click Open and please wait because the upload process is running. After the process is complete, the selected Word file will automatically appear in Google Drive. So how about friends, how easy is it? T...

How to Move Word Files to Desktop Screen

Image
The desktop is the first screen you see when you turn on your computer or laptop. Therefore I prefer to save files on the Desktop screen compared to data storage, especially if we put the file in many folders so we spend time looking for it. In general, we move Word files to the Desktop screen by simply copying and pasting, or we can also move Word files to the Desktop screen by creating a shortcut or shortcut. In my opinion, this method is very good compared to Copy or Cut. The method is very easy, friends first select the Word file you want to move or create a shortcut on the Desktop screen, then right-click on the mouse on the file, then select Send to and select Desktop, a Word file will automatically appear in the form of a shortcut. So if we open the Shortcut file on the Desktop, it's the same as opening the original file in the storage folder so it's easier to get it. Well, how about friends, how easy is it? That's the way to move Word files to the Desktop screen. Ho...

How to Move Word Files From Laptop to Flashdisk

Image
Maybe there are still friends who are still confused about how to insert a Word file into a Flashdisk, and are confused about how to quickly move it without copying and pasting the file, even though this method is commonly used by many people. To move Word files or other files from a laptop to a flash drive, it's very easy. The first step, friends, first insert the flash drive into the USB port and make sure that your flash drive still has free space. Then find the Word file that you want to move or insert into the flash drive, then right-click the mouse on the file, then select Send To. Then several choices of places to move the file will appear, friends, select a flash drive, friends, usually called a Removable Disk. After that the file we selected earlier will automatically be copied into the Flashdisk. So how about friends, how easy is it? That's the way to move Word files from a Laptop to a Flashdisk, I hope this tutorial can be useful for all of you.

How to Insert Word Files to Google Docs

Image
Maybe friends sometimes want to edit your Word document files in Google Docs but are confused about how to move them without retyping them. Now, to move or insert Word files into Google Docs, the method is very easy. Friends open Google Docs , then open the File selection which has a folder icon on the right and select Upload and select Browse. Select the Word file you want to include in Google Docs, then click OK. Then the Word file will open with Google Docs view. So how about friends, how easy is it? That's the way to move or insert Word files into Google Docs, I hope this tutorial can be useful for all of you.

How to Recover Deleted Files on PC Computers and Laptops

Image
Maybe friends accidentally delete or delete important files on a computer or laptop, and friends are confused about how to restore the deleted files to be recovered or restored. In general, most computers or laptops use the Windows operating system, and usually when we delete a file on Windows, the file will be stored first in the trash or Recycle Bin. So, if you delete a file, try to check in the Recycle Bin whether the file you deleted earlier is in the Recycle Bin. If so, friends can restore the file by right-clicking on the mouse on the file we want to restore. Then click Restore, the file will automatically disappear in the Recycle Bin and will appear in the folder where we last saved it, for example on the Desktop. So how about friends, how easy is it? That's the way to recover deleted files on a Windows Computer or Laptop. Hopefully this tutorial can be useful for all my friends.

How to Write in Pictures in Word

Image
To add text to an image in Microsoft Word, the method is very easy, the first step is to insert the image into Word, which we will add text to later. Besides that, prepare the writing that we will enter. It's best if the pictures and writing are related to each other, it's weird if the pictures are animals but the writing is about flowers. After that, set the size of the image in Word, it's best to change it to a large size so that later the writing can be seen. To add text in the image, we can use several ways, one of which is by using a Text Box. To do this, friends go to the Insert menu and select Text Box. Then friends, fill in the writing in the text box. Then friends, set the position and size of the writing in such a way, also set the typeface and the size of the letters and the spacing if the writing is more than one line. You can also adjust the color of the writing, and if necessary, effects can be added to the writing. For setting the text box, you can make it tr...

How to Align Page Numbers in a Word Table of Contents

Image
Sometimes we see a table of contents page where the page numbers are not aligned from top to bottom so that it makes the table of contents not look good. Sometimes also on the table of contents page we often see that the page numbers are aligned, but the dotted lines are not aligned at the end. Now, to align page numbers on the table of contents page, this is related to how we line the dots in the table of contents. Do friends make it automatically or manually. If you make it manually, you can be sure that the page numbers will be misaligned from top to bottom, or if the numbers are aligned then the dotted lines are not aligned. Then the best way is to make it automatically. Now, to align page numbers on the table of contents page, the method is very easy. Friends, first make a dotted line automatically on the table of contents page because by making a dotted line automatically it will make it easier to align the page numbers. Then at the end of the dotted line, press the space bar onc...

How to Add Page Numbers in Google Docs

Image
Maybe friends who have just switched from Microsoft Word to Google docs to create a document but are still confused about adding several features, one of which is adding page numbers. Although Microsoft Word and Google docs have the same function and some features are not much different. Well, as for adding page numbers in Google docs, the method is very easy. First of all open Google docs which we will add page numbers to. To make or add page numbers in Google docs, we can find the options on the Format menu and Insert Menu. In the insert menu we can determine the position of the page number whether we will install it at the top or bottom. Or we can also make the page number not appear on the start page in Google Docs. Well, how about friends, how easy is it? That's the way to add page numbers in Google Docs, I hope this tutorial can be useful for all of you.

How to Make Strikethrough Text in Excel

Image
What is Strikethrough? Strikethrough is a feature in Microsoft Office that is useful for striking out text in the middle or creating a horizontal line in the middle of writing. The way to make a line in the middle of writing in Excel is very easy. First of all, first prepare the writing or words that we will make a line in the middle. Then friends select the word or text, then right click on the mouse and select Format Cells, then select the Font Tab. On the Font Tab, friends check or check the word Strikethrough in the Effects section. After that click OK to save the settings and see the results. Well, how about friends, how easy is it? That's how to add a line in the middle of writing in Excel. Hopefully this tutorial can be useful for all my friends.

How to Change Paper Size on Google Docs Laptop

Image
Google Docs or Google Docs is a free word processing service from Google. This service is similar to Microsoft Word, although we cannot find some features in Word on Google Docs. To change the paper size in Google Docs, the method is very easy, first enter the File menu and then select Page Setup or Page Setup. In the Paper Size section on Page Setup, friends, change the paper size that you want. There are several paper sizes available, starting from Letter, Legal, A4, and other sizes. After that click OK to save the settings and see the results. Well, how about friends, how easy is it? That's how to change the paper size in Google Docs. Hopefully this tutorial can be useful for all my friends,

How to Set Margins on Google Docs Laptop

Image
Google Docs is a word processing service, which is a part of the Google Docs Editors suite from Google. These Google docs are similar to Microsoft Word, but the features are not as complete as in Word. Now, to set margins in Google docs, the method is very easy. Enter the file menu on Google docs, then select Page Setup or Page Setup. Then a new Page Setup or Page Setup window will appear, friends can directly determine the desired margin size in the margins section of Page Setup. Specify the margin size for Left, Top, Right, and Bottom, then click OK to save the settings. Now, the margins will automatically change according to the predetermined size. How is it friends, easy right? That's how to set margins in Google docs, I hope this tutorial is useful. If you think the explanation above is not clear, I suggest you also watch the video tutorial that I have previously prepared below. Good luck.

How to Make Diagonal Line in Word Tables

Image
Now there are times when when we make a table in Word, we are required to make or fill in several boxes in the table with an oblique line, usually to indicate that the box is not to be filled in. The way to make slashes is very easy. Friends, first determine which part of the table will be slashed by placing the cursor in the table box. After that, go to the Design menu on the Table Tools menu, in the Table Style section, friends, click the down arrow on Borders. Friends choose either Diagonal Down Border or Diagonal Up Border, or friends can choose both so that it becomes a cross in the table. So how about friends, how easy is it? I hope this tutorial can be useful for all my friends. More tutorials: How to Print 4 Pictures on One Page in Word 2010 How To Change Footnote Font in Word How to Put Page Number On Microsoft Word How to show Text Boundaries in Microsoft Word How to Show Vertical and Horizontal Ruler in Word